Creating a Custom Blog with Jekyll
Thu, Jan 18, 2018
The thought of starting a blog has beeen running through my mind for quite a while now. I figure it's time to finally act on the idea. I hope to write about my experiments and side projects (for both code and art), so keep an eye out! Regardless of future plans, the first order of business is, of course, actually creating a blog, which brings us to where we are now.
I've considering using a blogging platform like Wordpress or Tumblr and either embedding it into my website or simply linking to an external like Medium. Ultimately, after doing some research and consulting my friends for advice, (thanks Arlan!) I decided on building my own blog with Jekyll. The benefits are two-fold: I get to have full control over customizing the look of my blog, and it also gives me an opportunity to learn something new (and blog about it).
My web experience is not extensive: it consists mostly of plain HTML and CSS static sites that I build for fun, mixed with some Meteor and React. Learning something new on my own is always daunting, but luckily there are a lot of good tutorials floating around on the internet. That being said, what I write is entirely from bashing random keys and booping questionable buttons, so if something isn't quite right, please let me know!
I'll be walking through my process of creating this custom Jekyll blog in this post. Of course, there are plenty of Jekyll themes out there, if you want something quick. My goal here is to learn to do it myself, so I can use these tools to create exactly what I want. Hopefully it'll help you do the same!
Goals
- Make a blog with Jekyll that supports:
- Tags or categories
- Comments
- Must have seamless integration into the rest of my website
- Use the same templates, CSS, etc.
Note: I do gloss over all the HTML and CSS details, so you'll need some understanding of those to follow along.
Getting Started
Installing Jekyll is quite straightforward. Jekyll's documentation has a easy to follow installation guide, and should have everything you need.
We'll be creating a brand new Jekyll site that has a blog. We can then throw in whatever existing CSS and other pages that you want from your original site. (You'll see that I use the same index.html and all other pages and assets that I simply copied over from my original site.) If you want, you can even convert everything over to use Jekyll layouts, which is what I ended up doing!
Getting Jekyll up and running is pretty simple, too. I poked around their default template to figure out what everything does, but started with a blank Jekyll site for my blog.
# Create a new blank slate Jekyll site and the dir for it to live in: mysite
jekyll new mysite --blank

# Go into the directory
cd mysite
Here are some basic usage commands:
# Build the site into _site
jekyll build

# Build the site and preview it on your local web server at localhost:4000
jekyll serve
Your shiny new site should be up and running at localhost:4000 until you use ctrl-c to kill the server from that same terminal. As you can see, the webpage is entirely blank. (Good!) Jekyll is probably complaining about Configuration file: none in your terminal, which we'll fix prompty.
Site Anatomy
Our initialized Jekyll site is quite bare bones, and we'll have to add a bunch of folders and files to what's been created for us. First, it's important to understand the structure of it all.
# Jekyll blank site directory structure
mysite
├── _drafts
├── _layouts
├── _posts
├── _site		# This won't exist if you didn't try to build/serve the site
│   └── index.html
└── index.html
What does build mean? This directory that we have here is really just a bucket of information that Jekyll uses to build your website. You tell it what you want, and boom, it generates all the HTML and CSS that your audience actually sees and puts it in _site.
What's all this weird underscore stuff? That's all the stuff that does not directly compose our built site. That would be things like templates that are the buidling blocks of the site.
Where do I put my assets and other pages? Everything that's not prepended with an underscore is copied over into _site exactly where you put it. (e.g. /index.html will end up as /_site/index.html)
Now, let's add a couple new files and folders into the mix...
mysite
├── _config.yml	# New
├── _drafts
├── _includes		# New
├── _layouts
├── _posts
├── _sass		# New
├── _site		# This is automatically created for you in the build process
├── blog 		# New
│   └── index.html
├── css 		# New
│   └── styles.css
└── index.html
The Jekyll documentation's directory structure page has more in depth descriptions, but here's a quick run down:
- _config.yml - This is where all the important configuration information (site title, url, etc.) regarding your entire site lives. Jekyll uses this information to compile your site properly.
- _drafts - This is where all your unpublished posts live. Delete it if you'd like.
- _includes - This is where our partials live. That would be the headers, footers, etc. that can be repeated throughout our site.
- _layouts - Layouts live here.
- _posts - Published posts live here.
- _scss - Sass partials live here. This is NOT where your main SCSS/CSS lives, just the stuff that you would like imported into it.
- _site - Your generated site lives here.
- blog - I like to keep a separate folder with all the blog related pages and assets to keep my directory clean and separated from the rest of my site.
- css - This is where your actual CSS files live. Note that there is no underscore prepended to this dir name, so it will be copied into your compiled site.
Of course, create your .gitignore if you need/want to. Mine looks something like this:
.DS_Store
.jekyll-metadata
.sass-cache/
_site/
Next, let's take a look at that configuration file. This is where we configure the entire Jekyll site. For all available options, take a peek at the configuration doc. Here is a really basic _config.yml file:
title: Emilee Chen
baseurl: ""
url: "http://emileechen.com"
permalink: pretty

css: "/css/styles.css"
favicon: "/favicon.png"

navlinks:
  - name: work
    url: "/"
  - name: about
    url: "/about"
  - name: blog
    url: "/blog"

sass:
  sass_dir: _sass
For our purposes, none of these settings are really necessary besides the sass directory (if you're going to use sass). This file makes it very easy to customize a Jekyll template, and it's good practice to centralize all your info here. We can also easily access this info as variables to use anywhere on our site. I put a list of the links I want in my navbar as well as the CSS stylesheet and favicon paths here for that reason.
Front Matter
Before we can do anything Jekyll related, we must know about front matter. It's Very Important for Jekyll to function and build your site properly.
When Jekyll builds, it goes through all the files in your main directory and looks for something called a front matter block. It's denoted and bounded by a set of triple dashes and must be placed at the very beginning of a file. If a front matter block exists, Jekyll will processes the file (by reading it as a layout, shoving the page into a layout, filling in all the placeholder variables, etc.).
---
# You can insert comments

# And assign some useful predefined variables like...

# Specifying a layout: (we'll talk about how to create layouts next)
layout: default

# Specifying a permalink: (to ignore the actual location and define a new URL)
permalink: /blog/

# Specifying a title:
title: The Coolest Blog

# Even assign custom variables like so:
jive: some potentially useful information
---
Read more about this in the front matter doc.
Layouts
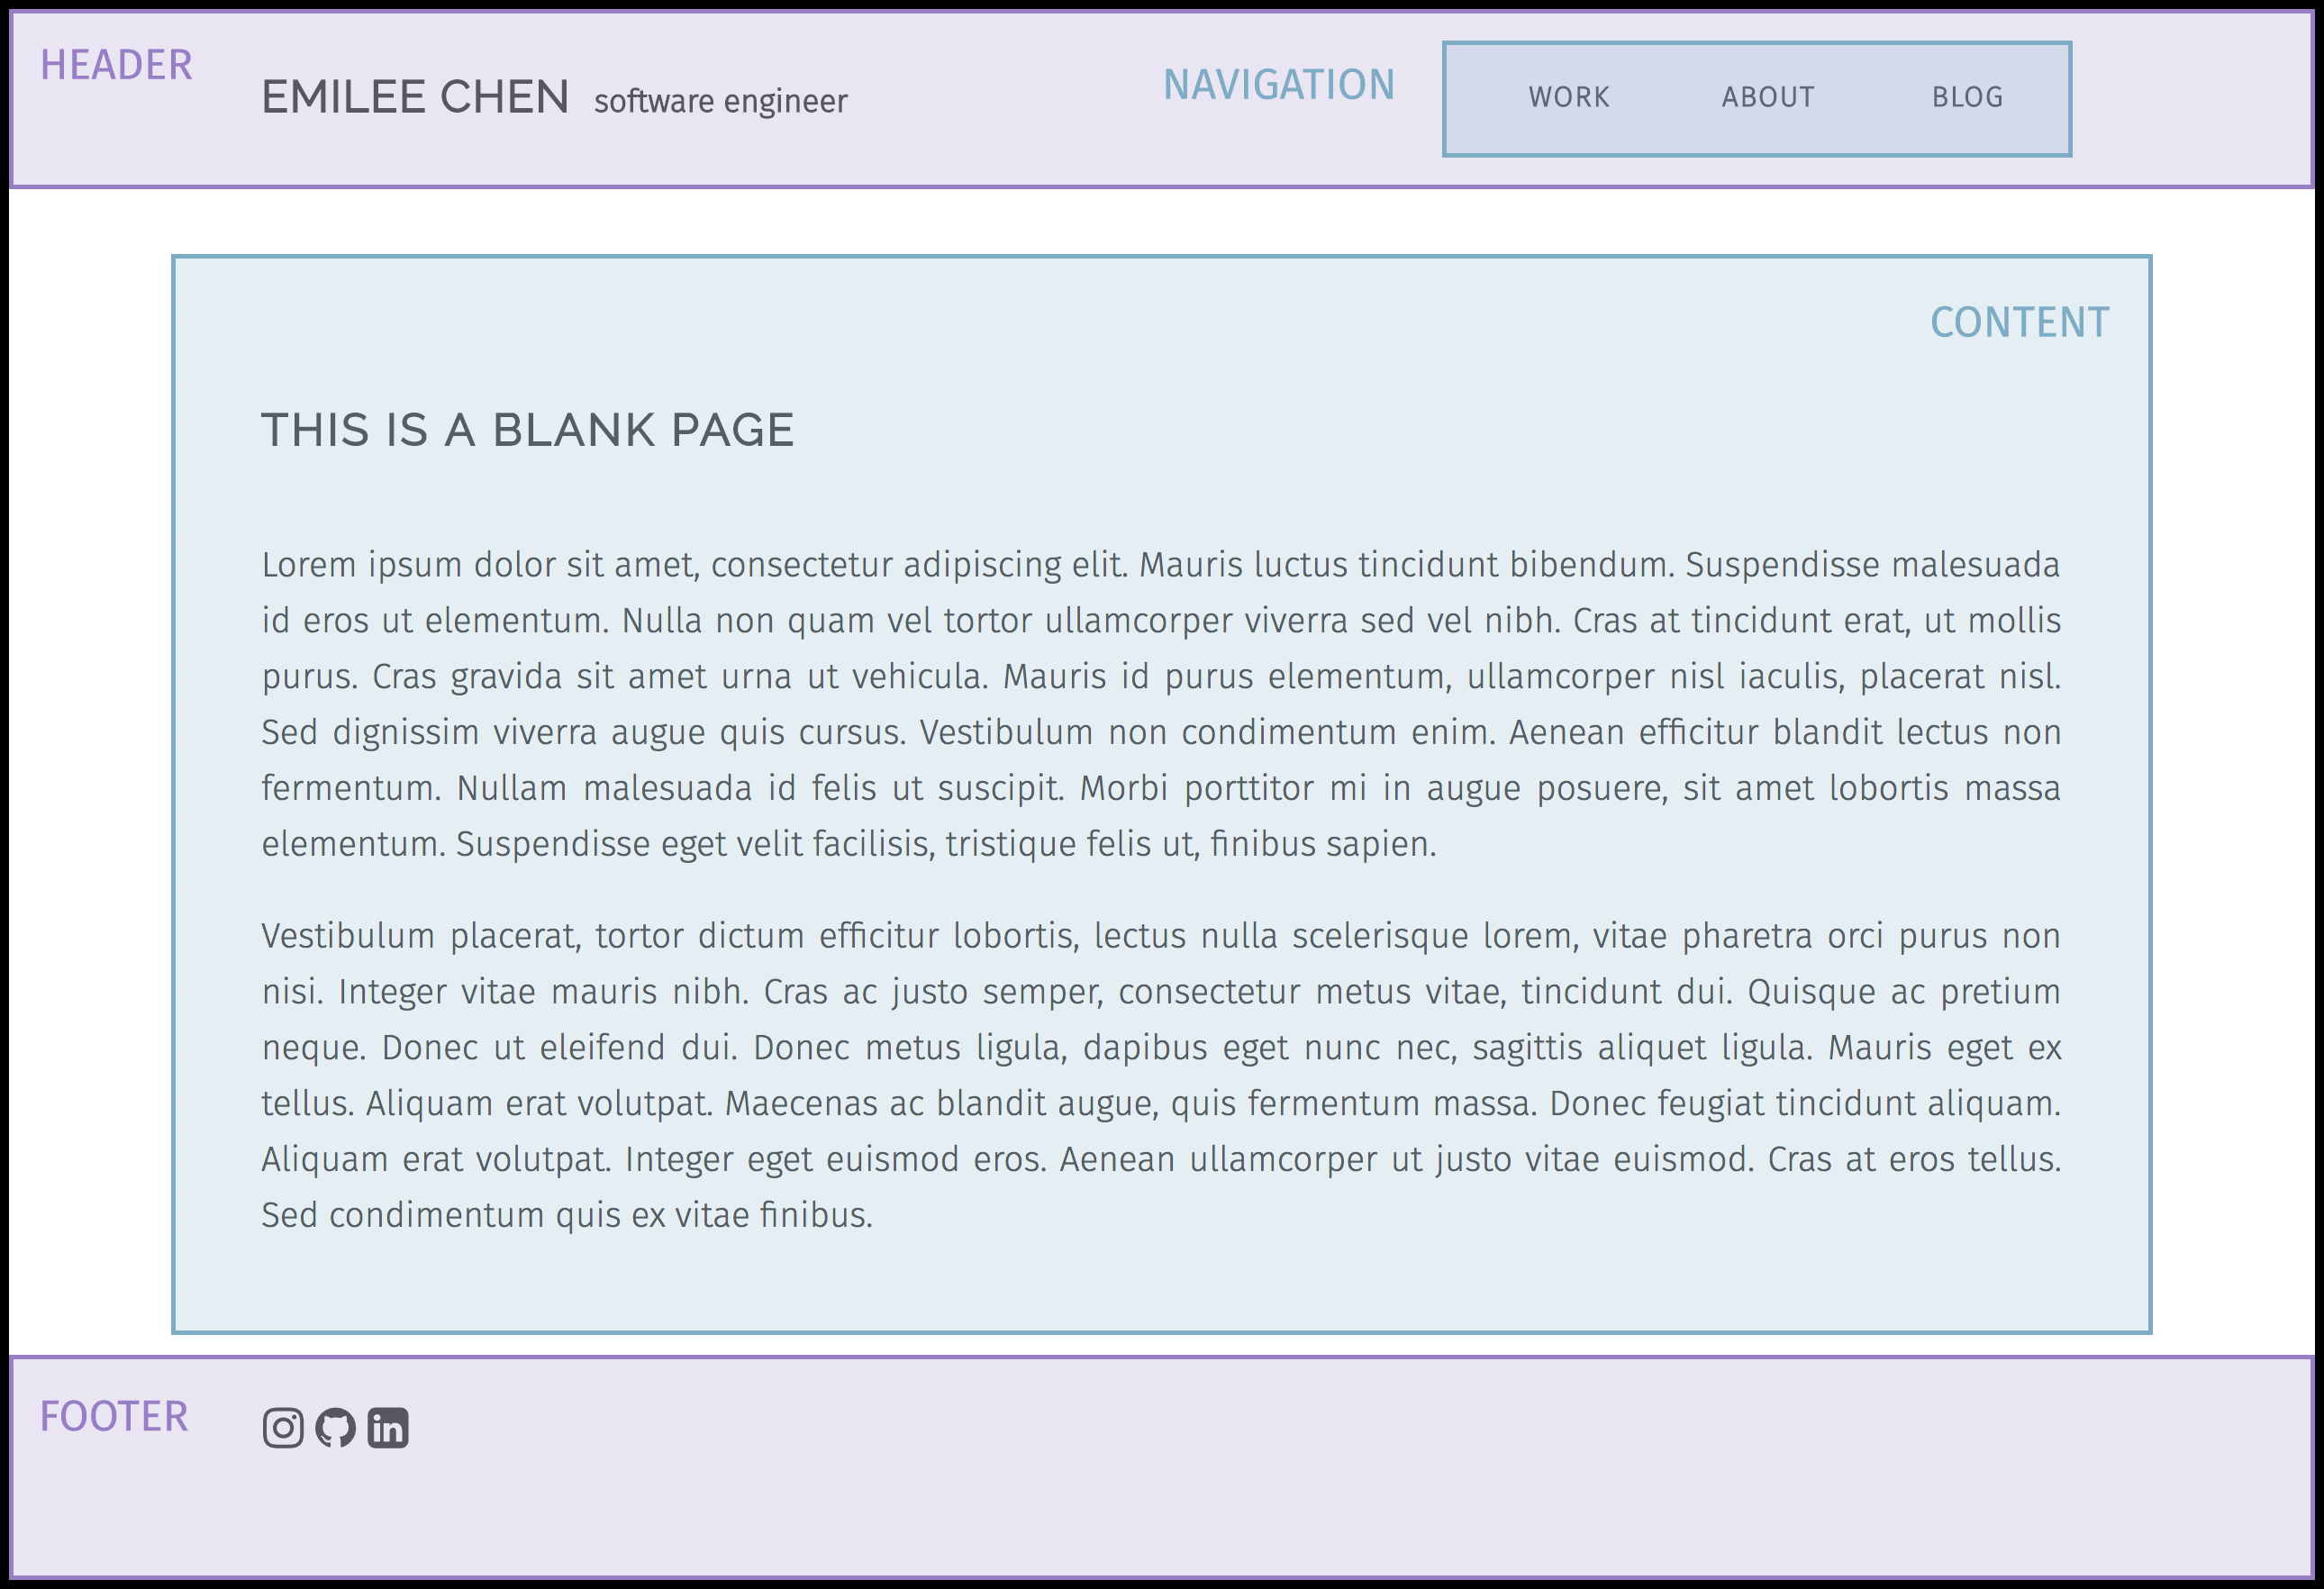
It's finally time to work on how our blog looks! Like I said earlier, I'm writing this guide with the goal of integrating this blog into a preexisting site. My current site template consists of a header, which also holds the navigaton, a footer, and some content. You should figure out sections for your layout however you see fit.
Layouts live in... *drumroll* ... _layouts. Crazy how that one works, eh? Anyway, layouts are exactly what you would expect. They describe the skeleton of a page that we can later use to fill out with actual content. You can make as many layouts as you'd like, though it's a good idea to reuse templates to keep your site cohesive.
/_layouts/default.html
Our first layout is default.html:
What are all these curly brackets?! Don't freak out! That's Liquid, a templating language. I'll go over it more in a bit. For now, just know that {% include filename.html %} inserts the specified HTML include file (files that live in _includes), and {{ content }} is where content get referenced and inserted when this layout is used.
What if I don't have any scripts? Then remove {{% include scripts.html %}}, and don't make a scripts.html. Make and include what elements make sense for your layout, and no more!
Remember! Jekyll won't know that this is something it should process if you don't put in a front matter block!
/_layouts/post.html
Besides the default layout, we also need a layout for blog posts. I named this layout post.html:
Use the default layout? Yup, layouts can use other layouts, too. Here, we build our post layout off of our default layout. It just means we replace {{ content }} of the default layout with this layout and use the resulting combined layout as our post layout. (Whew... say that three times fast...)
Err... {{ page.variable }}? Every blog post that you publish will have a independent page using this layout, and Liquid lets us grab variables from posts. | date: '%a, %b %d, %Y' is a filter (in this case, a date formatting filter applied on page.date), which will also be explained later.
Includes
While layouts help us keep the layout of our site/blog consistent, includes help us keep content persistent through all our pages consistent. This would be anything from navbars to scripts. As you can see from the default layout that we've just created, I need to make head.html, header.html, footer.html, and script.html include pages.
Jekyll will freak out about being unable to "locate the included file" if you try to reference an include file that you have not created!
/_includes/head.html
Our first include file is head.html:
We put the browser title here, and reference our CSS and favicon here, as you would expect.
/_includes/header.html
header.html:
Yup, your include can include other includes if you want.
/_includes/nav.html
nav.html:
As you can see by now, Liquid allows us to use if else clauses and for loops, which reduces repeating code greatly. Here, I am looping over a list of links, and either using plain text or an active link depending on whether or not the current page has the same title as the link by comparing page.title and link.name.
/_includes/footer.html
footer.html:
I have a simple, linked three icon footer that uses Font Awesome icons.
Variables and Liquid
Jekyll uses Liquid to allow us to access all kinds of variables using Liquid objects and do all kinds of fun stuff with tags and filters.
To render a variable, wrap it with {{ }}:
Basic programming logic tags are wrapped with {% %}:
Read about variables in the Jekyll variables doc and about Liquid syntax in the Liquid docs. There are also a lot of cheatsheets online. I particularly enjoy CloudCannon's Jekyll Cheat Sheet.
Pages
Our Jekyll blog will have three types of pages: the main page with a list of blog posts, our actual blog post pages, and a tags page with a list of tags and their corresponding blog posts.
Main Blog Page
This will be where our audience will land when they click on the Blog link in our navbar. Here we want to display and link to each blog post. We can use a for loop to automatically populate this page with all the posts.
/blog/index.html:
This HTML file may seem meaty, but most of it is just nesting div containers to stylize this page properly. The most important thing to note is the for loop, {% for post in site.posts %} ... {% endfor %}. Everything within the opening and closing tags will be repeated for each post. It also allows us access to variables (title, date, category, etc.) that we will be included in each blog post HTML we write. You can even get all kind of fancy with your formatting (cover photos for each post, hover animations, etc.).
Jekyll conveiently already has a notion of post excerpts, which is defaulted to the first paragraph of your blog post. This can also be manually overriden if you'd like. Read more about that on Jekyll's Post excerpts doc.
Post Pages
All of our blog posts that we want published to our site will live in /blog/_posts/. If you want a safe place to house your drafts, they can go in /blog/_drafts/, where the contents will not be built out to /_site/. If you want a safe place to house your drafts, they can go in /blog/_drafts/. For Jekyll to build your blog posts properly, each file much be named appropriately in this format: YEAR-MONTH-DAY-title.MARKUP.
/blog/_posts/2017-05-31-my-first-blog-post.html:
Once again, the front matter is Very Important! It holds all the variables that we were accessing from the list of posts earlier. Category and tags are special site variables. This means they have special functionality that we can take advantage of, such as accessing a list of all the tags from any page as {{ site.tags }} (well... sort of... we have to apply some liquid filters since it returns an array, but I'll show you how to do that in the next section).
You can have multiple tags and multiple categories. Multiple tags are a great feature, but I have a bone to pick with the option of multiple categories since it creates these really icky, nesting permalinks. Permalinks are the unique URLs that each full blog post are published at. You can, of course, customize them in your _config.yml, but Jekyll's default permalink template is /:categories/:year/:month/:day/:title.html.
Jekyll simply contatenates all your categories for the permalink. This means that if you've got category: [brunch, dessert], then your permalink becomes /brunch/dessert/.../title. This, to me, implies that the category of dessert is nested under the category of brunch. I quite dislike this, so I have opted for assinging exactly one category to each post.
As for permalink templates, I am personally a fan of the pretty option. See Jekyll's permalinks doc for how to configure permalinks.
Keep in mind that you should not change the category, date (year, month, day), or title of your post after you make it live. If you do, the next time you build the permalink for the blog post will change, and if someone bookmarked that page, the link will break.
Tags Page
It is nice to be able to browse within certain groupings of posts. I have opted to do this with tags instead of categories, but everything below will also work for categories if you use the site.categories variable instead of site.tags as I do below.
We will create a new page especially for this purpose. There will be a navigation section at the top that is a list of every tag that has been used. Below, each tag will once again be listed, but this time with all their corresponding posts. Each of these navigation tags will be linked to a corresponding anchor in our main section, so that finding a specific list of posts will be easy.
/blog/tags.html:
You'll see that we use {{ tag[0] }} several times. The global variable site.tags actually holds a list of lists, not a list of strings. The first item in the list is the name of the tag, and the second item is every single post that has that tag. So, to grab the name tags, we need to use {{ tag[0] }} or {{ tag | first }}.
The slugify string filter is used for the names of our anchors. While Jekyll handles spaces in tags nicely, the same cannot be said for HTML! Slugify converts a string to lowercase and removes all spaces and non-alphanumeric characters. Perfect for our anchors.
This is all very well and functional, but there is still room for improvement. You might have noticed that your tags are all out of order. That's something we can fix! It does get a little tricky here, since Liquid does not allow nested tags. What we would like to do is something along the lines of {% for tag in site.tags | sort %}. However, Liquid forces us to do it in two lines instead:
Great! We now have all the basic components of a blog. :)
Sass
Sass does not affect the functionality of our blog, but I love it so much I'm going to talk about it a little anyway. I love it mainly because you can assign variables with values such as HEX colours, lengths, and even fonts. Jekyll will compile your SCSS file from css/styles.scss into a CSS file at _site/css/styles.css.
/_sass/_variables.scss:
/css/styles.scss:
Remember to include a front matter block (the triple dashes) at the top of your Sass file! Of course, you can just write a plain CSS stylesheet if you'd like. A plain CSS stylesheet won't need to be compiled by Jekyll, so the front matter block won't be necessary.
Deployment
I have always used GitHub Pages to host my website. Not only is it free, GitHub Pages automatically builds and displays your webpage without any work from you at all. Well, that was surprisingly easy.
Closing
Phew! We're all done (for now). Now we have a foundation to build upon, we can look into adding more cool features, such as supporting comments and likes. This was a great learning experience for me, and I hope my recounting of this project helps you out as well. Good luck with your creation!
References
- How to list your jekyll posts by tags, Joe Kampschmidt
- Liquid Documentation
- Jekyll Documentation
- Jekyll Cheat Sheet, CloudCannon