Bamboo Laser Cut Name Plate
Sun, Apr 22, 2018
Making a laser cut wooden name plate has been a long time coming for me. It all started when I saw my co-worker's names proudly displayed in front of their offices and cubicles during my internship at Pixar two years ago. They looked so official! There isn't an intern budget for name plates, so I started thinking up ideas to make a custom one for myself. A lot of time has passed, and I did actually get an official one made for me as a resident, but the thought of having a different and unique name plate never left my list of 'Things I Am Excited To Make'.
I considered many different options (materials, methods, etc.) for my name plate, including 3D printing, paper quilling, and sewing. I got as far as sketching out some design ideas several times before "Adult Responsibilities and Obligations" made me table the project. Last month, I was fortunate enough to get into a bamboo laser cutting class with Kaelen as the instructor, so my custom name plate dream was revived.
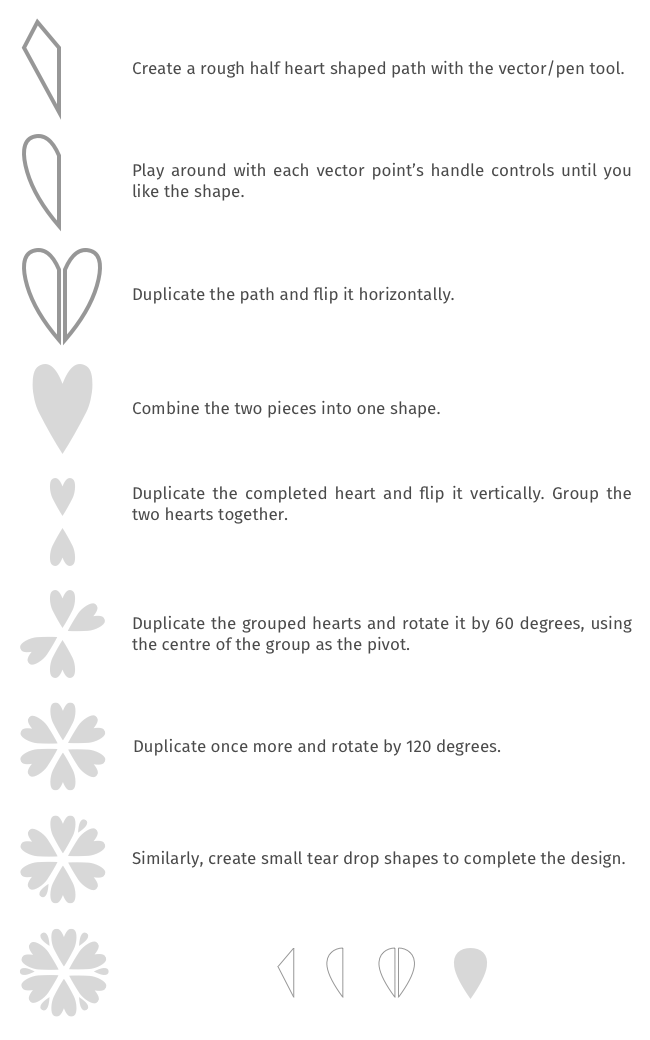
There are many things to keep in mind while designing a laser cut project like this. Initially, I had wanted to have a very busy engraved floral design. However, I soon discovered that not only is it a little overambitious to try to pen tool so many different elements when I'm still learning the ropes in Illustrator, it is also expensive to do many intricate designs. Curves take longer and more resources to laser in than lines, and engraved areas even more so. You are paying for the use of the laser cutter after all, so it makes sense that the complexity of your design will correlated directly with its cost.
So, to save time (slaving away in Illustrator) as well as money, I decided to do something minimalistic rather than intricate.
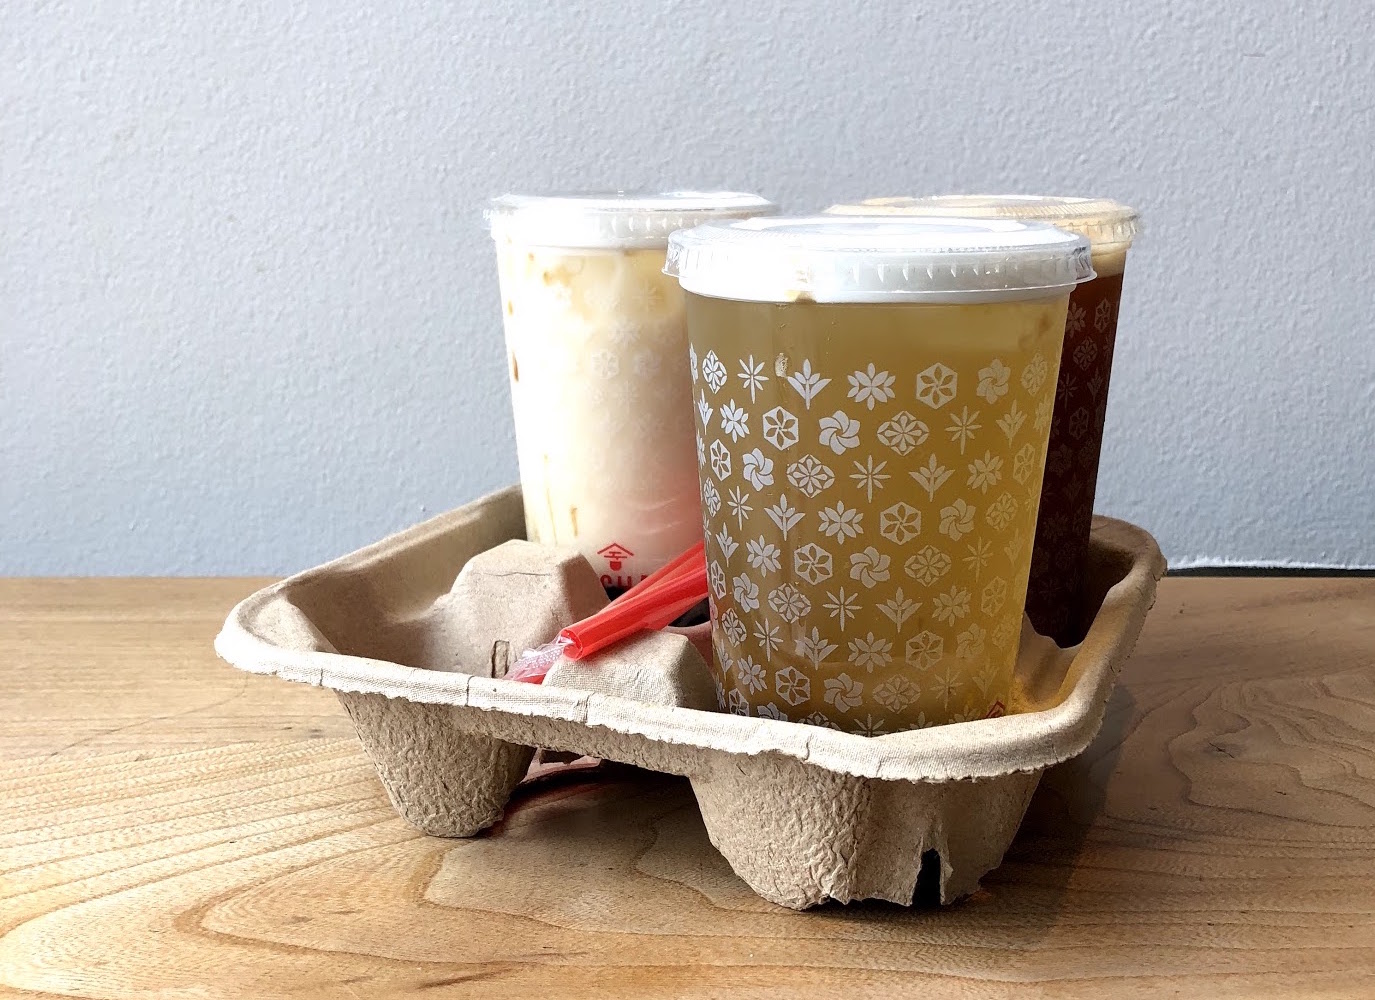
I looked around me for inspiration and decided that I was a big fan of the designs on Asha Tea House's new cold drink cups. (I was undecided previously, since the new cups seemed smaller than the old ones... ಠ_ಠ) I decided to stay pretty faithful to the cup's design and kept all the same individual designs (there were 6 in all that were tiled) but the one that would not work with cut outs.
The design below is a hexagon encasing a floral cut out. As shown, I came up with two ways of physically manifesting this design.
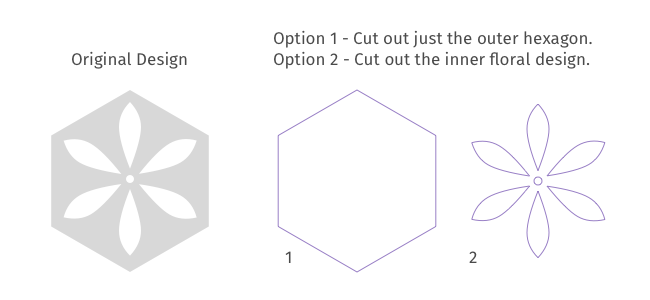
Not too keen on either option, I chose to create a new design with the same motif.
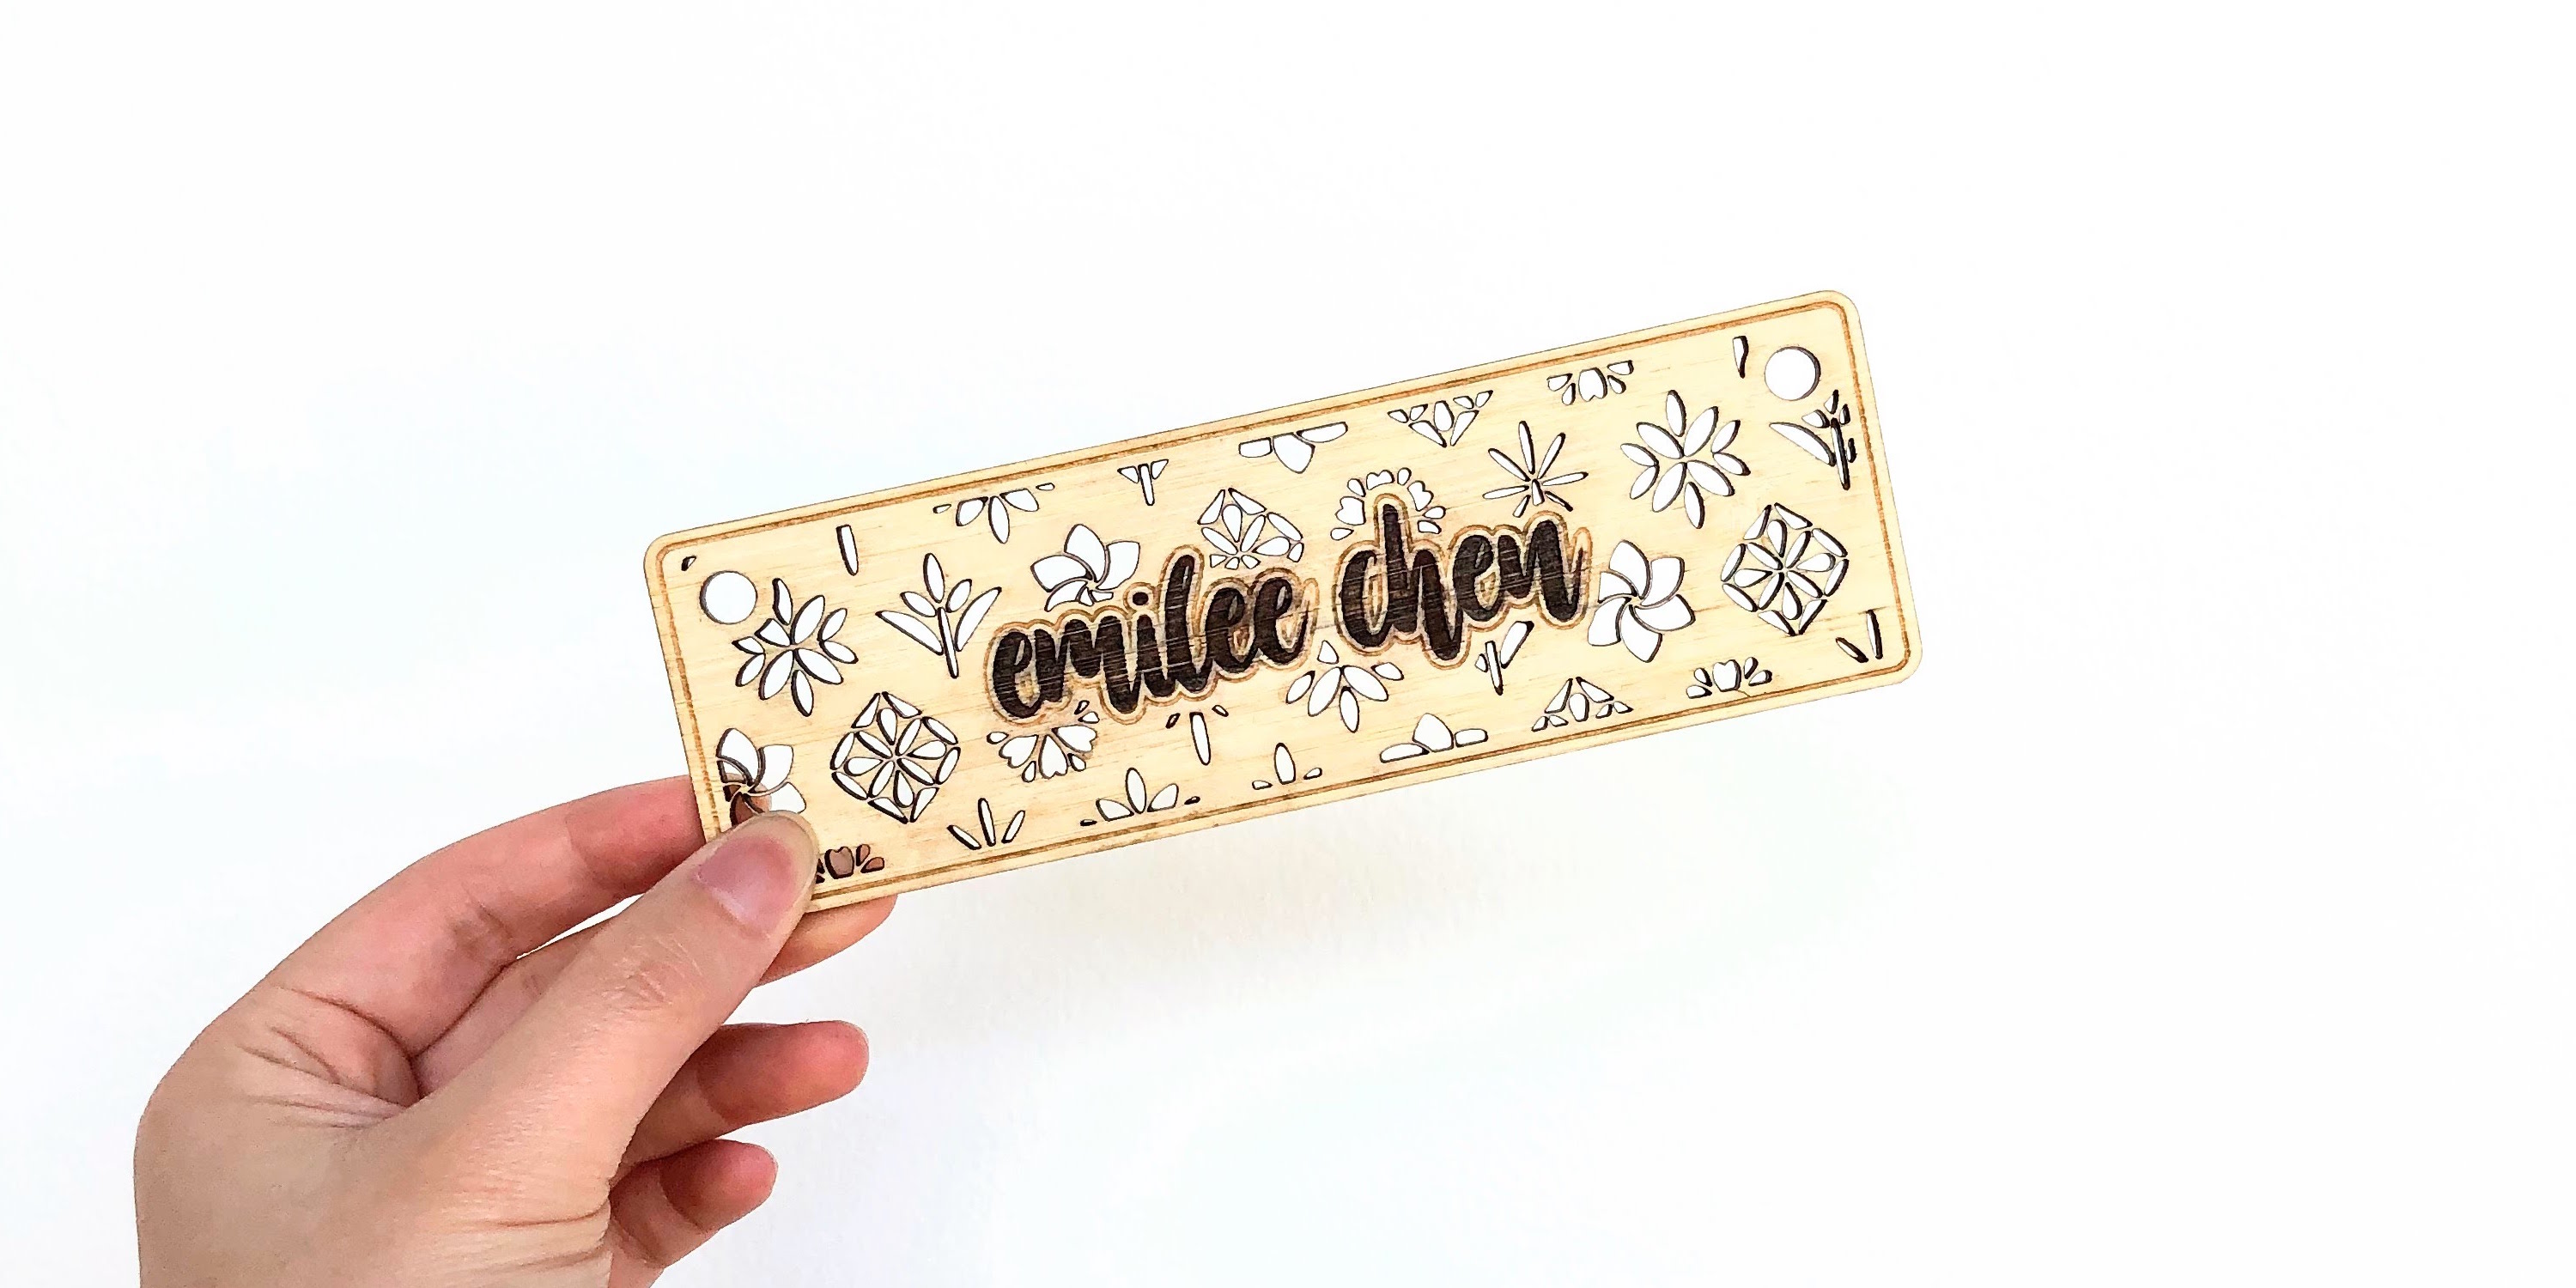
I created a tiling pattern with the six designs and put it inside a 2" x 6" base shape and added name engraving to the centre. For mine, I also added ½" holes for the name plate to be hung from. I also made one for my boyfriend without the holes, since I will be adding magnets to the back since he is going to be attaching it to a metal work bench frame.

I uploaded in the above design as an EPS file to Ponoko for them to laser cut and engrave. If memory serve correctly, the combined cost of both the materials and cutting came out to around $40. As part of the class, we visited the Ponoko office (conveniently located in Oakland!) to personally pick up our projects and see the laser cutting machines in action. Note: Different laser cutting services have different colour codes for engraving and cutting, so make sure you read their instructions carefully.
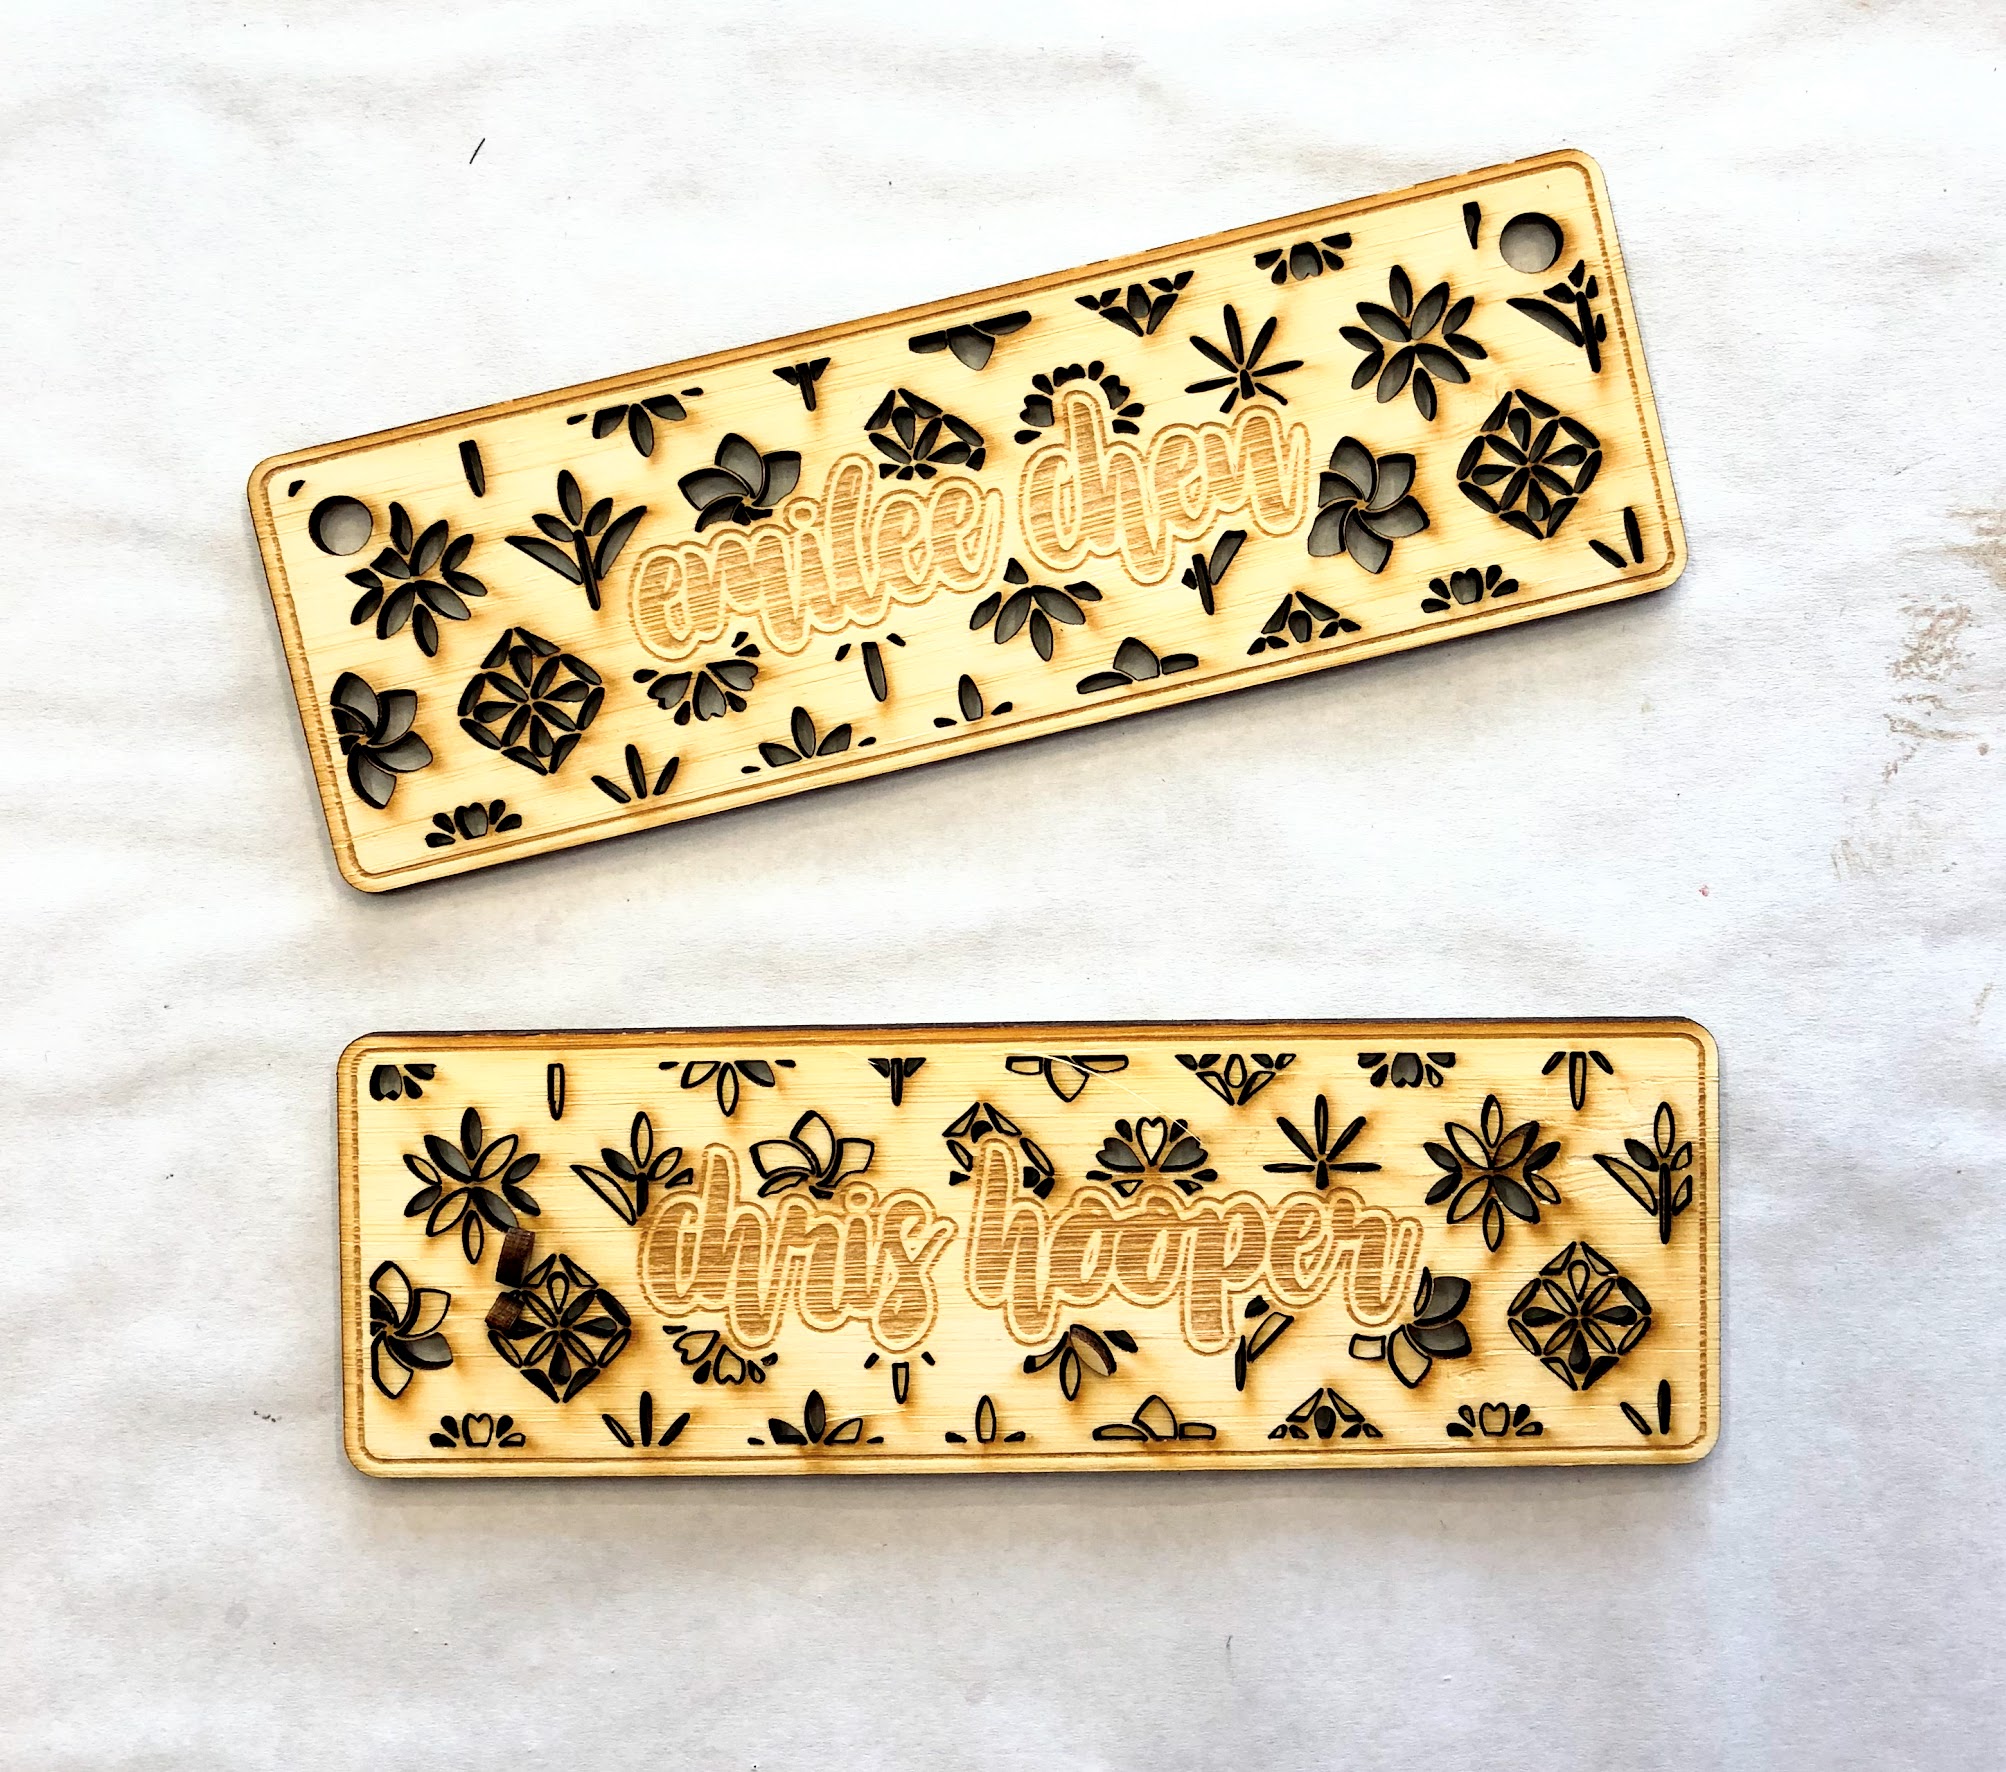
I absolute love how my name plates came out. It really makes you feel some kind of way holding something you designed in your own hands. I was lucky that none of the cut outs in the designs were too close to each other and susceptible to breakage. As you can see there are some smokey streaks across the front, which I will proceed to sand off. The word engravings were also surprisingly light coloured, and definitely needs some work.
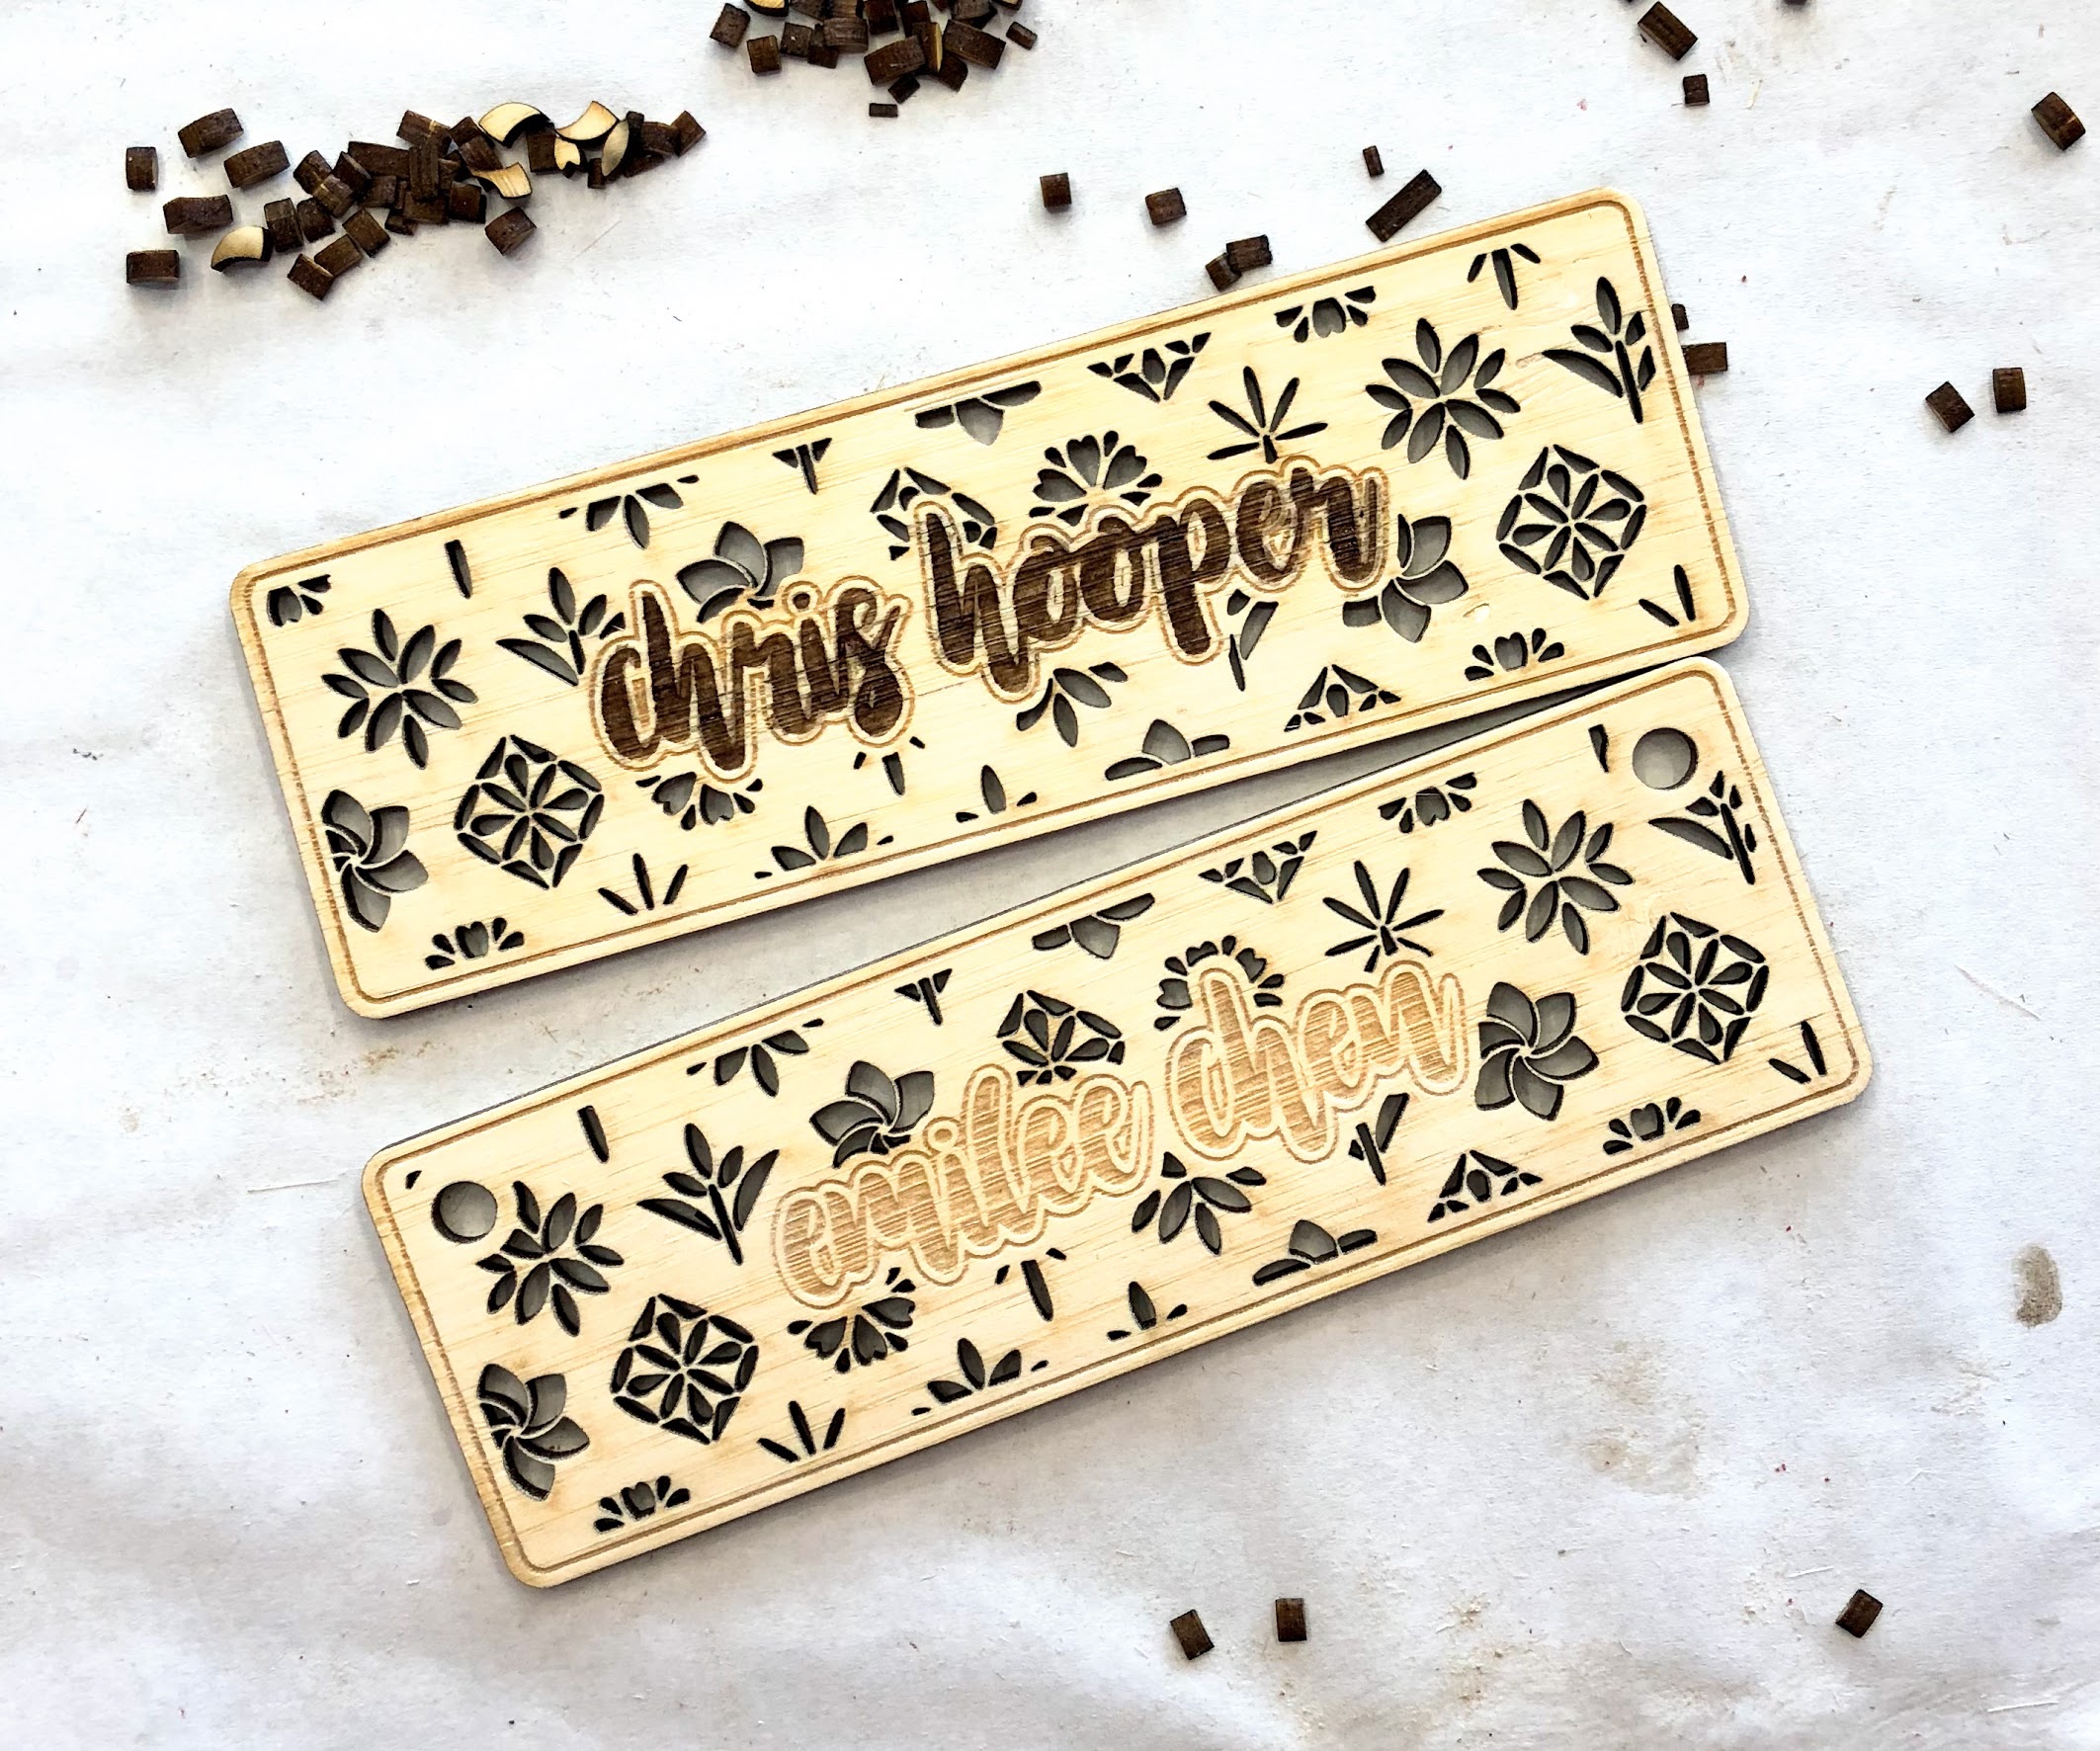
After some TLC, they start looking a lot better. I sanded off the smokey streaks and took a very, very tiny brush to carefully fill in the engravings with wood stain. The stain unfortunately ended up seeping out of the engraved area since the bamboo is so porous. Finally, I applied a clear coat of wood sealer. They're not perfect, but they certainly do look unique!
I belatedly learned that you can request that Ponoko put a sheet of transfer tape on the front face of the wood to use as a mask while you paint. I found this blog post by Yana Skaler very helpful. I think if I were to do this a second time, I would request a transfer tape mask and see if applying a layer of sealer on the wood before any stain or paint would help with preventing colour from seeping into the material and ruining the crisp edges. I am also interested to see how nail polish would react on wood, if only because I have so many pretty colours lying around that could stand some use.
If you want to see some more pictures, check out my Instagram post here. All in all, 10 out of 10, five stars, would highly recommend a project like this.
Tagged With: crafting design lasercut woodworking